Mochi: A Pillar of Japanese Culture
Mochi, the soft and chewy rice cake enjoyed in Japan for centuries, is more than just a beloved treat—it is a deeply rooted cultural symbol, and we have a Red Bean-Filled Mochi recipe for you today. Made from glutinous rice flour, mochi’s history dates back over a thousand years, with its origins tied to religious rituals and celebrations. The unique texture, achieved through a meticulous pounding process, gives mochi its distinct chewiness, making it a favorite among traditional and modern Japanese desserts alike. Whether eaten plain, filled, or flavored, mochi represents the harmony of simplicity and craftsmanship.
Beyond its delightful taste, mochi holds a significant place in Japanese customs and traditions. One of the most well-known mochi-related ceremonies is Mochitsuki, the traditional practice of pounding glutinous rice into a smooth, elastic dough. Families and communities come together to make mochi, symbolizing unity and prosperity for the coming year. During Oshogatsu (New Year’s celebrations), mochi is commonly served in dishes like ozoni (mochi soup) and displayed in the form of kagami mochi, an offering to the gods for good fortune.
Mochi’s importance extends beyond the New Year, as it is widely enjoyed during various seasonal festivals. In spring, mochi is often wrapped in sakura (cherry blossom) leaves and served as sakura mochi, marking the arrival of warmer days. During the autumn Tsukimi festival, people eat tsukimi dango, round mochi balls symbolizing the full moon. Even in daily life, mochi is a staple in Japanese sweets (wagashi), paired with red bean paste, matcha, or roasted soybean powder (kinako), highlighting the deep connection between mochi and Japan’s rich culinary heritage.
The chewy, comforting texture of mochi has also gained worldwide popularity, making its way into Western desserts like ice cream-filled mochi and fusion pastries. Despite these modern adaptations, the essence of mochi remains unchanged—a representation of perseverance, purity, and shared joy. The delicate balance of flavors and textures continues to captivate people globally, bridging cultural gaps through a simple yet meaningful treat.
If you want to experience the magic of mochi at home, making it from scratch is a rewarding process. The following recipe is an easy way to create delicious red bean-filled mochi, dusted with kinako for an authentic finish. While traditional mochi is made using steamed rice, this version utilizes glutinous rice flour, allowing you to enjoy the beloved Japanese treat with minimal effort.
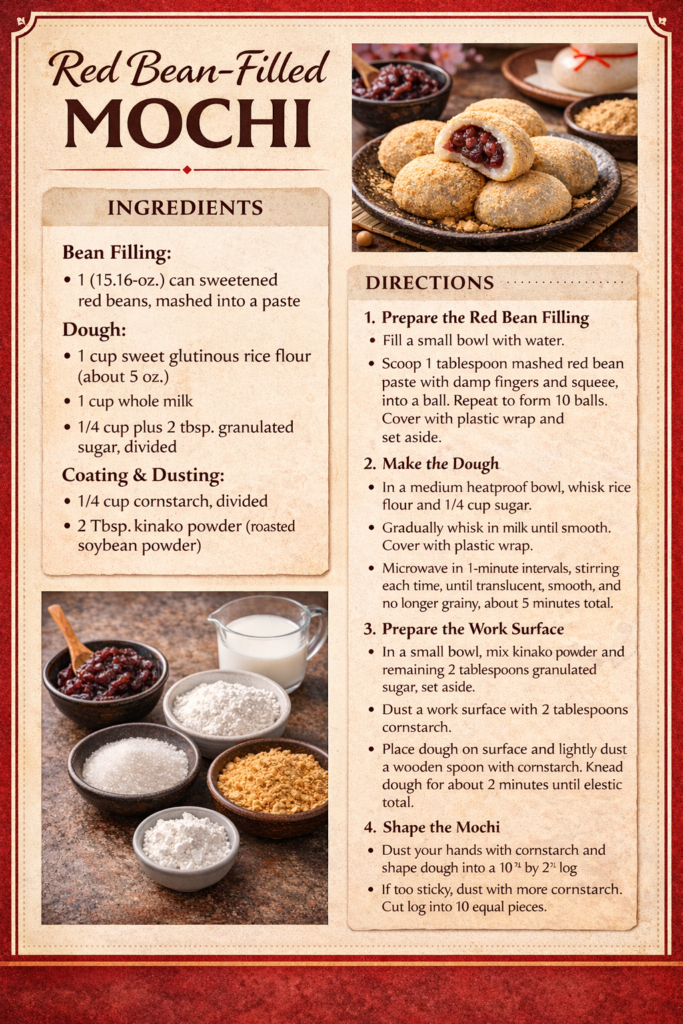
Red Bean-Filled Mochi Recipe
Ingredients
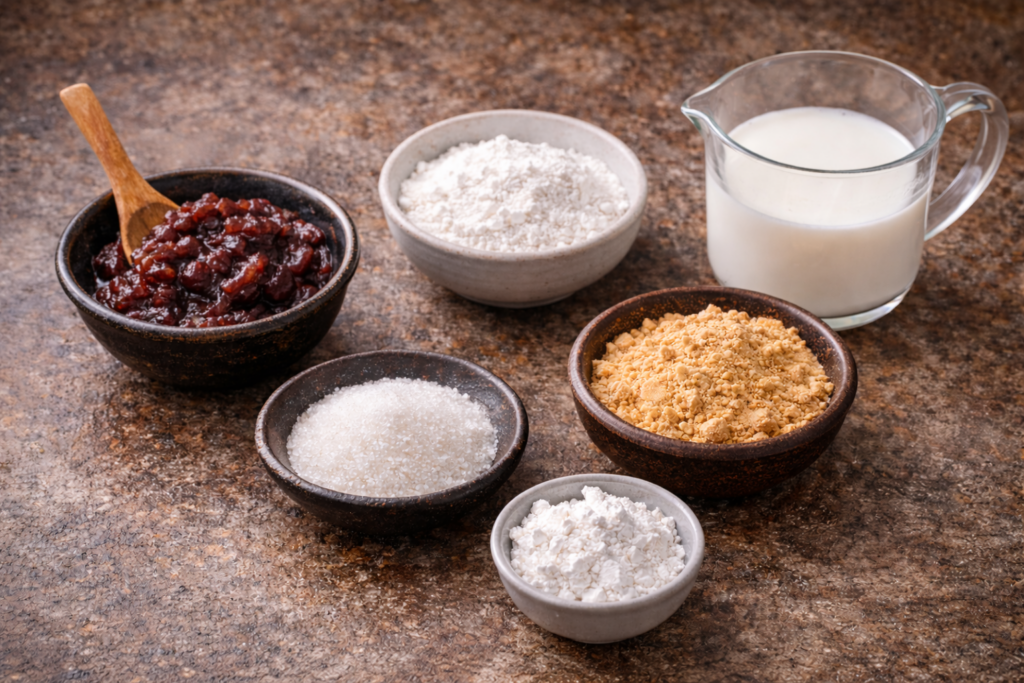
- Bean Filling:
- 1 (15.16-oz.) can sweetened red beans, mashed into a paste
- Dough:
- 1 cup sweet glutinous rice flour (about 5 oz.)
- 1 cup whole milk
- 1/4 cup plus 2 tbsp. granulated sugar, divided
- Coating & Dusting:
- 1/4 cup cornstarch, divided
- 2 Tbsp. kinako powder (roasted soybean powder)
Directions
Step 1: Prepare the Red Bean Filling
- Fill a small bowl with water.
- Dab some water on your fingers and scoop 1 tablespoon of the mashed red bean paste.
- Shape into a ball and transfer to a plate.
- Repeat to form 10 balls.
- Cover with plastic wrap and set aside.
Step 2: Make the Dough
- In a medium heatproof bowl, whisk the sweet glutinous rice flour and 1/4 cup sugar.
- Gradually whisk in the whole milk until the mixture is smooth.
- Cover the bowl with plastic wrap and microwave in 1-minute intervals, stirring with a wooden spoon after each round.
- Continue microwaving and stirring until the dough becomes translucent, smooth, and no longer grainy (about 5 minutes total).
Step 3: Prepare the Work Surface
- In a small bowl, mix the kinako powder with the remaining 2 tablespoons of granulated sugar; set aside.
- Dust a clean work surface with 2 tablespoons of cornstarch.
- Place the cooked dough onto the work surface.
- Lightly coat a wooden spoon with cornstarch and knead the dough for about 2 minutes until it becomes more elastic.
Step 4: Shape the Mochi
- Dust your hands with cornstarch to prevent sticking.
- Shape the dough into a 10-inch by 2-inch log.
- If the dough is too sticky, dust with additional cornstarch.
- Using a sharp knife, cut the log into 10 equal pieces.
Step 5: Fill and Seal the Mochi
- Take one piece of dough and flatten it into a 2 1/2-inch disc.
- Place one red bean ball in the center of the dough.
- Pinch the edges together to seal, then roll in the kinako mixture.
- Place the mochi seam-side down on a plate.
- Repeat for the remaining 9 pieces.
Step 6: Storing the Mochi
- Mochi can be made up to 3 days ahead.
- Store in an airtight container at room temperature.
- Do not refrigerate, as mochi will harden.
Recipe Card